教程合集
【导航】教程检索清单
A01-Windows安装VMWare Workstation
A02-VMware安装CentOS
A03-解压版CentOS7使用方法
A04-VMware+Centos7 静态IP设置方法
A05-CentOS7替换yum源为阿里云
A06-Xshell使用教程
A07-Xshell连接阿里云ECS-CentOS远程服务器
A08-xmanager图形化连接CentOS
A09-Kali虚拟机磁盘扩容
A10-Windows虚拟机和物理机互传文件的几种方式
A11-虚拟机安装Kali和远程连接
A12-VMware安装Rocky Linux9.4
A13-解压版RockyLinux9.4使用方法
A14-安装Xmanager
A15-CentOS7修改语言为中文或英文
B75-pip常用命令
A16-Linux开机自动登录root用户(不用输密码)
A17-Kali配置静态IP
A21-Win10安装教程
A22-Win7安装教程
A23-Windows Server系统安装
A31-vmware安装Ubuntu18.04
A32-Vmware安装Ubuntu23
A33-Vmware安装Ubuntu24
A41-在Android手机上安装kali Linux
A51-如何在公网服务器(比如阿里云)安装kali
A52-kali如何安装中文输入法
A53-Kali Linux安装pip2
B01-Windows环境安装MySQL Server 步骤
B02-Navicat安装使用
B03-MySQL忘记root密码或者root密码错误
B04-Windows配置解压版MySQL5(免安装)
B05-MySQL如何建库建表
B21-Windows安装python3.x
B22-安装sqlmap
B23-Windows多个Python版本如何切换
B24-如何在cmd运行Python代码
B30-JetBrains全家桶通用激活流程IntelliJ IDEA、PhpStorm、PyCharm、CLion……
B31-Windows安装PhpStorm2024
B31-Windows安装PhpStorm2025
B39-Windows多个Java版本如何切换
B40-Windows配置JDK8及以下版本
B41-Windows配置JDK9及以上版本
B42-IDEA2022安装和激活
B42-IDEA2024安装和激活
B42-IDEA2025安装和激活
B43-IDEA配置Maven
B44-IDEA配置tomcat运行JavaWeb工程
B45-IDEA修改Java版本
B46-IDEA部署WebGoat靶场
B50-Windows安装VSCode
B51-vc++安装教程
B52-VScode编译C语言
B53-VSCode运行Java工程
B54-VSCode运行Python代码
B55-Windows安装Pycharm
B56-VSCode右键在浏览器运行PHP代码
B61-配置cmder
B62-Windows安装Go开发环境
B63-Windows安装CLion运行C代码
B64-PWN环境配置
B71-Windows安全狗安装教程
B72-Windows安装使用Anaconda
B73-Windows安装Git教程
C01-启动中国蚁剑antsword
C02-Oneforall安装与使用
C03-Xray下载与使用
C04-Windows安装AWVS24/25
C04-windows安装AWVS14
C05-部署Cobalt Strike服务端和启动Cobalt Strike客户端
C06-Win10安装MSF(metasploit framework)
C07-Nuclei使用教程
C11-Fortify安装
C12-Charles破解教程
C13-谷歌chrome浏览器安装crx插件(hackbar为例)
C14-firefox浏览器安装扩展工具教程(以hackbar为例)
C15-XSStrike工具安装和使用
C16-xsser工具安装和使用
C31-hbit安装与使用
C32-kali系统安装与使用aquatone
C33-水泽Shuize安装(包含灯塔ARL)
C34-kali安装nessus
C35-ip反查域名
C36-火狐浏览器替换js脚本
C41-社会工程学BadUSB刻录流程
D01-Windows安装phpstudy
D02-Win10安装Apache和PHP
D03-解压版Apache2.4+PHP7.4.22使用方法
D11-Apache安装WAF+modsecurity
D12-Phpstudy部署安全狗
D13-Windows Apache配置自签名https证书
D14-Windows虚拟机安装OpenEDR
D21-PHP、Apache环境中部署sqli-labs
D22-PHP、Apache环境中部署DVWA
D23-PHP、Apache环境中部署pikachu
D24-PHP、Apache环境中部署upload-labs
D25-PHP、Apache环境中部署xsslabs
D26-PHP、Apache环境中部署bwapp
D27-PHP、Apache环境中部署wordpress博客
D31-XSS平台xssplatform搭建
F01-CentOS7源码方式安装Redis
F01-CentOS7 yum方式安装Redis6
F02-CentOS7 yum方式安装MySQL 5
F03-阿里云CentOS7安装msf
F04-Centos7安装vnc
F05-CentOS7源码方式安装nginx
F06-CentOS 7 搭建Web服务
F07-CentOS安装使用宝塔面板
F08-Ubuntu安装Web服务(Apache、MySQL、PHP)
F09-CentOS 安装python39
F10-Linux配置Java和切换版本(包括CentOS、Kali)
F11-Linux使用conda解决python工具的依赖问题
F12-Linux安装雷池WAF
F13-Ubuntu安装开源堡垒机JumpServer
F14-Ubuntu安装开源蜜罐HFish
F15-Ubuntu安装开源杀软ClamAV
F16-开源态势感知系统liuying单机版使用方法
F17-Ubuntu安装开源IDS/IPS系统Suricata
F18-Ubuntu安装Python3.9
F19-Ubuntu源码方式安装Redis
F20-Ubuntu虚拟机设置静态IP
F21-阿里云ECS设置安全组规则
F22-Ubuntu修改apt源为清华源
G01-CentOS7yum方式安装Docker最新版
G02-Ubuntu安装Docker和docker-compose
G11-Docker安装MySQL
G12-CentOS安装vulhub靶场
G13-阿里云Docker镜像加速器使用方法
G14-Kali安装Docker和vulhub
G15-Docker安装crapi靶场
G16-Docker安装beef-xss
G17-Ubuntu安装 Vulhub 环境
G18-Ubuntu18.04安装Metarget云原生漏洞环境(云安全靶场)
G21-CentOS7和Kali安装ARL灯塔
G22-AWD平台搭建
G23-自己搭建CTF平台
G24-pandora搭建(ChatGPT)
H01-启动和激活Burp
H02-Ubuntu安装Burp
H03-Burp反激活流程
H04-火狐浏览器发送数据包到Burp(安装证书)
H05-谷歌chrome浏览器发送数据包到Burp(安装证书)
H06-火狐浏览器安装FoxyProxy
H21-Burp抓手机App包
H22-Burp抓包逍遥(安卓)模拟器
H31-Burp识别验证码暴破密码
H32-Yakit绕过pikachu Token实现密码暴破
H41-设置burp自带浏览器访问外网
J01-MacBook Air m1安装CentOS7
J02-MacBook Air m1安装Win11及配置
J03-MacBook Air m1安装Kali
J04-MacOS搭建Apache+PHP+MySQL环境
K11-微信小程序反编译
K21-proxifier配合bp抓取小程序的数据包
K22-夜神模拟器安装burp证书实现微信小程序抓包
K23-逍遥模拟器通过Charles(青花瓷)+Postern+burp抓包配置流程
K31-App抓包教程
K32-Fiddler配合BurpSuite抓包
M01-双屏幕使用教程
M03-内网穿透
M04-免费下载doc88道客巴巴文档
M05-Kali安装佩奇文库(PeiQi-WIKI)
M06-Ubuntu虚拟机搭建乌云镜像站wooyun
M07-阿里云服务器自建DNSLog平台
M09-压缩包密码暴破工具ARCHPR使用教程
M10-篡改猴安装插件教程(去广告、文库免费下载、解除防复制等)
M11-Hack The Box账号注册教程
M12-Everything支持拼音搜索和全文搜索
M13-谷歌chrome浏览器打开实时字幕(免费)
苹果系统安装虚拟机
PWN Windows 环境准备
B47-Maven常用操作
B74-conda常用命令
Android 环境准备
B06-MySQL如何备份和恢复数据库
H07-启动和激活Burp-linux版
B74-Windows安装NodeJS教程
B75-Windows安装Wireshark
Ubuntu安装Go环境
Windows部署 OWASP Juice Shop靶场
vmware安装Windows Server2022
Windows安装PostgreSQL
本文档使用 MrDoc 发布
-
+
首页
C07-Nuclei使用教程
# 基本介绍 Nuclei 是一款由 ProjectDiscovery 团队用Go语言开发的开源漏洞扫描工具,基于 YAML 模板驱动,专注于定制化模板实现高效安全检测。 它支持多种协议,如 HTTP、DNS、TCP、SSL 等,并具备高性能架构,可进行大规模并发扫描。 Nuclei 的核心优势在于其灵活的定制和扩展能力,用户可以自定义模板或使用社区维护的丰富模板库。 此外,Nuclei 还支持云平台集成、WAF 绕过等功能,适用于渗透测试、红队演练、漏洞验证及日常安全监控等多种场景。 中文教程: https://github.com/projectdiscovery/nuclei/blob/dev/README_CN.md # Kali安装 更新APT缓存: (如果报错,需要解决[APT-KEY的问题](https://wiki.bafangwy.com/doc/94/ "APT-KEY的问题")) `apt-get update` 安装Nuclei: `apt install nuclei` 模板路径:`/root/.local/nuclei-templates` # Windows安装 https://github.com/projectdiscovery/nuclei/releases 例如Windows下载: nuclei_3.4.2_windows_amd64,解压放到一个没有空格和中文的目录 为方便调用,把nuclei.exe的路径添加到PATH环境变量: 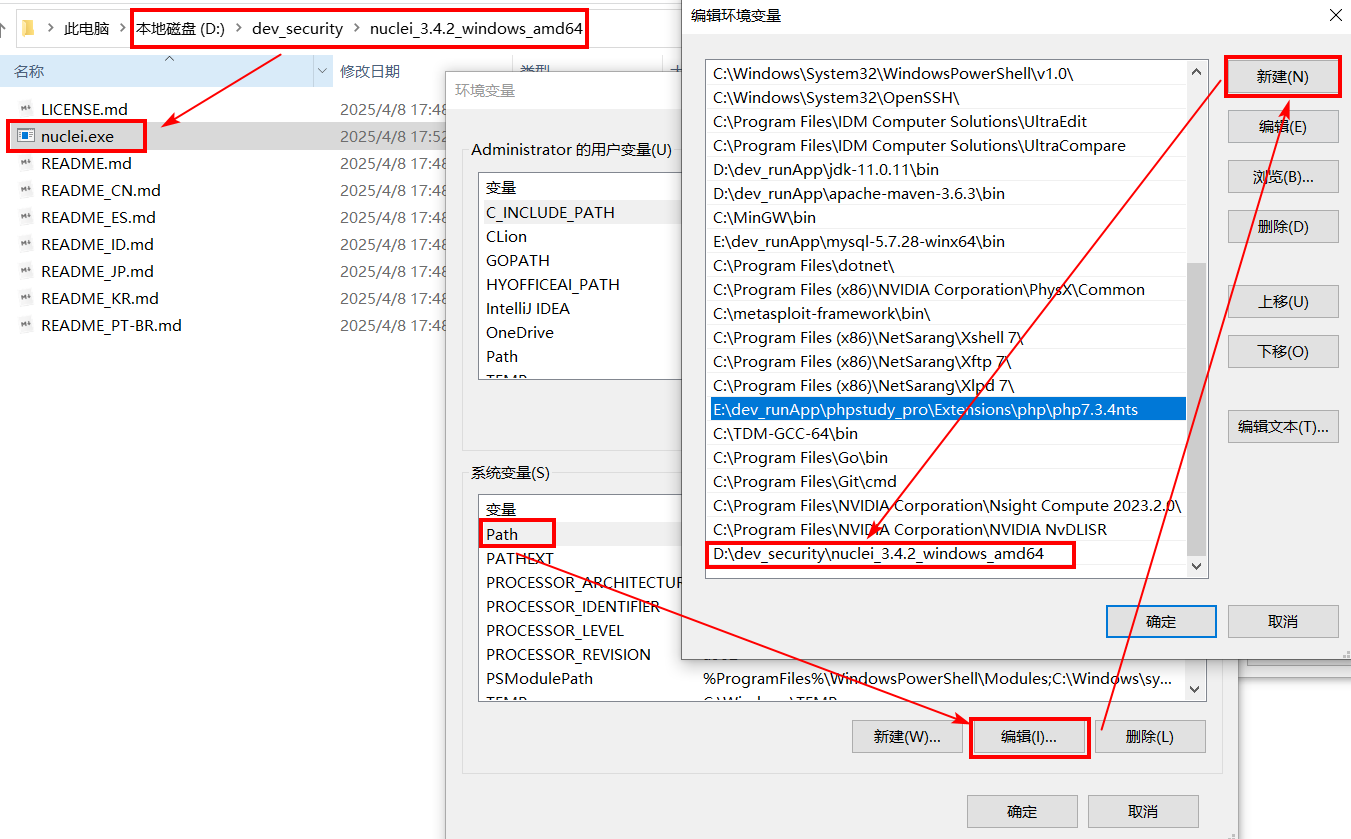 打开cmd,输入`nuclei`即可使用。 Windows配置文件: `C:\Users\Administrator\AppData\Roaming\nuclei\config.yaml` uncover配置文件: `C:\Users\Administrator\AppData\Roaming\uncover\provider-config.yaml` # 更新模板(漏洞规则库) 第一次启动,会自动下载模板库。手动更新模板库使用命令: `nuclei -update-templates` 或者:`nuclei -ut` 模板默认存储目录: `C:\Users\用户名\nuclei-templates` 例如: `C:\Users\Administrator\nuclei-templates` # 基本扫描语法 `nuclei -u http://example.com -t /path/to/templates/` -u 指定目标 URL -t 指定规则模板目录(模板既有自带的,也可以自己编写)。 # 支持的命令 用法: `nuclei [命令]` 查看帮助: `nuclei -h` ## 命令 | 选项 | 释义 | 示例 | | --- | --- | --- | | -u, -target string[] | 指定扫描的目标URL/主机(多个目标则指定多个-u参数) | nuclei -u http://example.com -u http://testsite.com | | -l, -list string | 指定包含要扫描的目标URL/主机列表的文件路径(一行一个) | nuclei -l targets.txt -u example.com | | -resume string | 使用指定的resume.cfg文件恢复扫描(将禁用请求聚类) | nuclei -resume scan_resume.cfg | | -sa, -scan-all-ips | 扫描由目标解析出来的所有IP(针对域名对应多个IP的情况) | nuclei -u http://example.com -sa | | -iv, -ip-version string[] | 要扫描的主机名的IP版本(4,6)-(默认为4) | nuclei -u http://example.com -iv 6 <br>nuclei -u http://example.com -iv 4 -iv 6 | ## 模板 | 选项 | 释义 | 示例 | | --- | --- | --- | | -nt, -new-templates | 仅运行最新发布的nuclei模板 | nuclei -u http://example.com -nt | | -ntv, -new-templates-version string[] | 仅运行特定版本中添加的新模板 | nuclei -u http://example.com -ntv 8.7.0 -ntv 8.8.0 | | -as, -automatic-scan | 基于Wappalyzer技术的标签映射自动扫描 | nuclei -u http://example.com -as | | -t, -templates string[] | 指定要运行的模板或者模板目录(以逗号分隔或目录形式) | nuclei -u http://example.com -t template1.yaml -t templates/ | | -turl, -template-url string[] | 指定要运行的模板URL或模板目录URL<br>(以逗号分隔或目录形式) | nuclei -u http://example.com -turl http://example.com/templates/template1.yaml -turl http://example.com/templates/ | | -w, -workflows string[] | 指定要运行的工作流或工作流目录<br>(以逗号分隔或目录形式) | nuclei -u http://example.com -w workflow1.yaml -w workflows/ | | -wurl, -workflow-url string[] | 指定要运行的工作流URL或工作流目录URL<br>(以逗号分隔或目录形式) | nuclei -u http://example.com -wurl http://example.com/workflows/workflow1.yaml -wurl http://example.com/workflows/ | | -validate | 使用nuclei验证模板有效性 | nuclei -validate | | -nss, -no-strict-syntax | 禁用对模板的严格检查 | nuclei -u http://example.com -t template1.yaml -nss | | -td, -template-display | 显示模板内容 | nuclei -td template1.yaml | | -tl | 列出所有可用的模板 | nuclei -tl | | -sign | 使用NUCLEI_SIGNATURE_PRIVATE_KEY<br>环境变量中的私钥对模板进行签名 | nuclei -sign -t template1.yaml | | -code | 启用加载基于协议的代码模板 | nuclei -u http://example.com -code | ## 过滤 | 选项 | 释义 | 示例 | | --- | --- | --- | | -a, -author string[] | 执行指定作者的模板(逗号分隔,文件) | nuclei -u http://example.com -a JohnDoe,JaneSmith | | -tags string[] | 执行带指定tag的模板(逗号分隔,文件) | nuclei -u http://example.com -tags cve,xss | | -etags, -exclude-tags string[] | 排除带指定tag的模板(逗号分隔,文件) | nuclei -u http://example.com -etags info,low | | -itags, -include-tags string[] | 执行带有指定tag的模板,即使是被默认或者配置排除的模板 | nuclei -u http://example.com -itags test | | -id, -template-id string[] | 执行指定id的模板(逗号分隔,文件) | nuclei -u http://example.com -id 12345,67890 | | -eid, -exclude-id string[] | 排除指定id的模板(逗号分隔,文件) | nuclei -u http://example.com -eid 12345,67890 | | -it, -include-templates string[] | 执行指定模板,即使是被默认或配置排除的模板 | nuclei -u http://example.com -it template1.yaml,template2.yaml | | -et, -exclude-templates string[] | 排除指定模板或者模板目录(逗号分隔,文件) | nuclei -u http://example.com -et template1.yaml,templates/ | | -em, -exclude-matchers string[] | 排除指定模板matcher | nuclei -u http://example.com -em status | | -s, -severity value[] | 根据严重程度运行模板,可选值有:info,low,medium,high,critical | nuclei -u http://example.com -s high,critical | | -es, -exclude-severity value[] | 根据严重程度排除模板,可选值有:info,low,medium,high,critical | nuclei -u http://example.com -es info,low | | -pt, -type value[] | 根据类型运行模板,可选值有:dns, file, http, headless, network, workflow, ssl, websocket, whois | nuclei -u http://example.com -pt http,ssl | | -ept, -exclude-type value[] | 根据类型排除模板,可选值有:dns, file, http, headless, network, workflow, ssl, websocket, whois |nuclei -u http://example.com -ept headless,workflow | | -tc, -template-condition string[] | 根据表达式运行模板 | nuclei -u http://example.com -tc "id=12345 and tags=cve" | ## 输出 | 选项 | 释义 | 示例 | | --- | --- | --- | | -o, -output string| 输出发现的问题到文件 | nuclei -u http://example.com -o output.txt | | -sresp, -store-resp| 将nuclei的所有请求和响应输出到目录 | nuclei -u http://example.com -sresp | | -srd, -store-resp-dir string| 将nuclei的所有请求和响应输出到指定目录(默认:output) | nuclei -u http://example.com -srd custom_output_dir | | -silent| 只显示结果 | nuclei -u http://example.com -silent | | -nc, -no-color|禁用输出内容着色(ANSI转义码) |nuclei -u http://example.com -nc | | -j, -jsonl| 输出格式为jsonL(ines) |nuclei -u http://example.com -j | | -irr, -include-rr| 在JSON、JSONL和Markdown中输出请求/响应对(仅结果)[已弃用,使用-omit-raw替代] |nuclei -u http://example.com -irr -j | | -or, -omit-raw|在JSON、JSONL和Markdown中不输出请求/响应对 |nuclei -u http://example.com -or -j | | -ot, -omit-template| 省略JSON、JSONL输出中的编码模板 | nuclei -u http://example.com -ot -j| | -nm, -no-meta| 在cli输出中不打印元数据 | nuclei -u http://example.com -nm | | -ts, -timestamp| 在cli输出中打印时间戳 | nuclei -u http://example.com -ts | | -rdb, -report-db string| 本地的nuclei结果数据库(始终使用该数据库保存结果) | nuclei -u http://example.com -rdb nuclei_results.db | | -ms, -matcher-status| 显示匹配失败状态 |nuclei -u http://example.com -ms | | -me, -markdown-export string| 以markdown格式导出结果 | nuclei -u http://example.com -me results.md | | -se, -sarif-export string| 以SARIF格式导出结果 | nuclei -u http://example.com -se results.sarif | | -je, -json-export string| 以JSON格式导出结果 | nuclei -u http://example.com -je results.json | | -jle, -jsonl-export string| 以JSONL(ine)格式导出结果 | nuclei -u http://example.com -jle results.jsonl | ## 配置 | 选项 | 释义 | 示例 | | --- | --- | --- | | -config string | 指定nuclei的配置文件 | nuclei -u http://example.com -config custom_config.yaml | | -fr, -follow-redirects| 为HTTP模板启用重定向 | nuclei -u http://example.com -fr | | -fhr, -follow-host-redirects | 允许在同一主机上重定向 | nuclei -u http://example.com -fhr | | -mr, -max-redirects int| HTTP模板最大重定向次数(默认:10) | nuclei -u http://example.com -mr 5 | | -dr, -disable-redirects| 为HTTP模板禁用重定向 | nuclei -u http://example.com -dr | | -rc, -report-config string|指定nuclei报告模板文件 | nuclei -u http://example.com -rc report_template.json | | -H, -header string[]| 指定在所有http请求中包含的自定义header、cookie,以header:value的格式指定(cli,文件) | nuclei -u http://example.com -H "Authorization: Bearer YOUR_TOKEN" -H "Cookie: session=abc123" | | -V, -var value | 以key=value格式自定义变量 | nuclei -u http://example.com -V "api_key=12345" -V "user_id=67890" | | -r, -resolvers string| 指定包含DNS解析服务列表的文件 | nuclei -u http://example.com -r resolvers.txt | | -sr, -system-resolvers| 当DNS错误时使用系统DNS解析服务 | nuclei -u http://example.com -sr | | -dc, -disable-clustering| 关闭请求聚类功能 | nuclei -u http://example.com -dc | | -passive | 启用被动模式处理本地HTTP响应数据 | nuclei -u http://example.com -passive | | -fh2, -force-http2| 强制使用http2连接 | nuclei -u http://example.com -fh2 | | -ev, env-vars | 启用在模板中使用环境变量 | nuclei -u http://example.com -ev | | -cc, -client-cert string| 用于对扫描的主机进行身份验证的客户端证书文件(PEM 编码) | nuclei -u https://example.com -cc client_cert.pem | | -ck, -client-key string| 用于对扫描的主机进行身份验证的客户端密钥文件(PEM 编码) | nuclei -u https://example.com -ck client_key.pem | | -ca, -client-ca string| 用于对扫描的主机进行身份验证的客户端证书颁发机构文件(PEM 编码) | nuclei -u https://example.com -ca client_ca.pem | | -sml, -show-match-line| 显示文件模板的匹配值,只适用于提取器 | nuclei -u http://example.com -sml | | -ztls | 使用ztls库,带有自动回退到标准库tls13 [已弃用] 默认情况下启用对ztls的自动回退 | nuclei -u https://example.com -ztls | | -sni string | 指定tls sni的主机名(默认为输入的域名) | nuclei -u https://example.com -sni custom_host | | -lfa, -allow-local-file-access |允许访问本地文件(payload文件) |nuclei -u http://example.com -lfa | | -lna, -restrict-local-network-access |阻止对本地/私有网络的连接 |nuclei -u http://example.com -lna | | -i, -interface string| 指定用于网络扫描的网卡 | nuclei -u http://example.com -i eth0 | | -at, -attack-type string| payload的组合模式(batteringram,pitchfork,clusterbomb) | nuclei -u http://example.com -at clusterbomb | | -sip, -source-ip string| 指定用于网络扫描的源IP | nuclei -u http://example.com -sip 192.168.1.100 | | -rsr, -response-size-read int | 最大读取响应大小(默认:10485760字节) | nuclei -u http://example.com -rsr 5242880 | | -rss, -response-size-save int | 最大储存响应大小(默认:1048576字节) | nuclei -u http://example.com -rss 1048576 | | -reset | 删除所有nuclei配置和数据文件(包括nuclei-templates) | nuclei -reset| | -tlsi, -tls-impersonate| 启用实验性的Client Hello(ja3)TLS 随机化功能 | nuclei -u https://example.com -tlsi | ## 交互 | 选项 | 释义 | 示例 | | --- | --- | --- | | -inserver, -ineractsh-server string | 使用interactsh反连检测平台(默认为oast.pro,oast.live,oast.site,oast.online,oast.fun,oast.me) | nuclei -u http://example.com -inserver custom.interactsh.com| | -itoken, -interactsh-token string |指定反连检测平台的身份凭证 |nuclei -u http://example.com -itoken your_api_token | | -interactions-cache-size int |指定保存在交互缓存中的请求数(默认:5000) | nuclei -u http://example.com -interactions-cache-size 1000 | | -interactions-eviction int | 从缓存中删除请求前等待的时间(默认为60秒) | nuclei -u http://example.com -interactions-eviction 30 | | -interactions-poll-duration int | 每个轮询前等待时间(默认为5秒) | nuclei -u http://example.com -interactions-poll-duration 10 | | -interactions-cooldown-period int |退出轮询前的等待时间(默认为5秒) | nuclei -u http://example.com -interactions-cooldown-period 10 | | -ni, -no-interactsh | 禁用反连检测平台,同时排除基于反连检测的模板 | nuclei -u http://example.com -ni | ## 模糊测试 | 选项 | 释义 | 示例 | | --- | --- | --- | | -ft, -fuzzing-type string | 覆盖模板中设置的模糊测试类型(replace、prefix、postfix、infix) | nuclei -u http://example.com -ft replace | | -fm, -fuzzing-mode string | 覆盖模板中设置的模糊测试模式(multiple、single) | nuclei -u http://example.com -fm multiple | ## UNCOVER引擎 | 选项 | 释义 | 示例 | | --- | --- | --- | | -uc, -uncover |启动uncover引擎 | nuclei -uc | | -uq, -uncover-query string[] |uncover查询语句 | nuclei -uc -uq "port:22"<br>nuclei -uc -uq "port:80" -uq "port:443" | | -ue, -uncover-engine string[] |指定uncover查询引擎 (shodan,censys,fofa,<br>shodan-idb,quake,hunter,zoomeye,netlas,<br>criminalip,publicwww,hunterhow) (默认 shodan) | nuclei -uc -ue shodan -ue fofa -uq "port:80" | | -uf, -uncover-field string |查询字段 (ip,port,host) (默认 "ip:port") | nuclei -uc -uf ip:port -uq "port:22"<br>nuclei -uc -uf host -uq "port:80"| | -ul, -uncover-limit int |查询结果数 (默认 100) | nuclei -uc -ul 50 -uq "port:80" | | -ur, -uncover-ratelimit int |查询速率,默认每分钟60个请求(默认 60) | nuclei -uc -ur 30 -uq "port:80" | ## 限速 | 选项 | 释义 | 示例 | | --- | --- | --- | | -rl, -rate-limit int | 每秒最大请求量(默认:150)| nuclei -u http://example.com -rl 50 | | -rlm, -rate-limit-minute int | 每分钟最大请求量| nuclei -u http://example.com -rlm 1000 | | -bs, -bulk-size int | 每个模板最大并行检测数(默认:25)| nuclei -u http://example.com -bs 50 | | -c, -concurrency int | 并行执行的最大模板数量(默认:25)| nuclei -u http://example.com -c 50 | | -hbs, -headless-bulk-size int | 每个模板并行运行的无头主机最大数量(默认:10)| nuclei -u http://example.com -hbs 20 | | -headc, -headless-concurrency int | 并行指定无头主机最大数量(默认:10)| nuclei -u http://example.com -headc 20 | ## 优化 | 选项 | 释义 | 示例 | | --- | --- | --- | | -timeout int | 超时时间(默认为10秒) | nuclei -u http://example.com -timeout 5 | | -retries int | 重试次数(默认:1) | nuclei -u http://example.com -retries 3 | | -ldp, -leave-default-ports | 指定HTTP/HTTPS默认端口(例如:host:80,host:443) | nuclei -u http://example.com -ldp | | -mhe, -max-host-error int | 某主机扫描失败次数,跳过该主机(默认:30) | nuclei -u http://example.com -mhe 10 | | -te, -track-error string[] | 将给定错误添加到最大主机错误监视列表(标准、文件) | nuclei -u http://example.com -te "connection refused" -te "timeout" | | -nmhe, -no-mhe | 禁止因错误导致的主机扫描跳过 | nuclei -u http://example.com -nmhe | | -project | 使用项目文件夹避免多次发送同一请求 | nuclei -u http://example.com -project | | -project-path string | 设置特定的项目文件夹 | nuclei -u http://example.com -project -project-path /path/to/project | | -spm, -stop-at-first-path | 得到一个结果后停止(或许会中断模板和工作流的逻辑) | nuclei -u http://example.com -spm | | -stream | 流模式 - 在不整理输入的情况下详细描述 | nuclei -u http://example.com -stream | | -ss, -scan-strategy value | 扫描时使用的策略(auto/host-spray/template-spray) (默认 auto) | nuclei -u http://example.com -ss host-spray | | -irt, -input-read-timeout duration 输入读取超时时间(默认:3分钟) | nuclei -u http://example.com -irt 5m | | -nh, -no-httpx | 禁用对非URL输入进行httpx探测 | | | -no-stdin | 禁用标准输入 | nuclei -u http://example.com -nh | ## 无界面浏览器 -headless 是一个用于浏览器模式的参数,它指示 Nuclei 在无头模式(Headless Mode)下运行浏览器。无头模式是指浏览器在没有图形用户界面(GUI)的情况下运行,通常用于自动化测试或爬虫等场景。 **作用** - 提高性能和效率:在无头模式下运行浏览器可以显著减少资源消耗,因为不需要渲染图形界面。这使得 Nuclei 可以更高效地执行扫描任务。 - 自动化测试:在某些模板中,Nuclei 可能需要通过浏览器来模拟用户交互(如点击按钮、填写表单等)。使用 -headless 参数可以在后台自动完成这些操作,而无需手动操作浏览器。 - 避免干扰:无头模式运行浏览器可以避免因图形界面导致的干扰,例如弹窗、广告等,从而更专注于扫描目标。 使用场景 | 选项 | 释义 | 示例 | | --- | --- | --- | | -headless | 启用需要无界面浏览器的模板 | nuclei -u http://example.com -headless | | -page-timeout int | 在无界面下超时秒数(默认:20) | nuclei -u http://example.com -headless -page-timeout 30 | | -sb, -show-brower | 在无界面浏览器运行模板时,显示浏览器 | nuclei -u http://example.com -headless -sb | | -ho, -headless-options string[] | 使用附加选项启动无界面浏览器 | nuclei -u http://example.com -headless -ho "--disable-images" | | -sc, -system-chrome | 不使用Nuclei自带的浏览器,使用本地浏览器 | nuclei -u http://example.com -headless -sc | | -lha, -list-headless-action | 列出可用的无界面操作 | nuclei -lha | 综合案例: 假设你想启用无界面浏览器支持,将超时时间设置为30秒,使用本地浏览器,并显示浏览器窗口,运行命令: `nuclei -u http://example.com -headless -page-timeout 30 -sc -sb` ## 调试 | 选项 | 释义 | 示例 | | --- | --- | --- | | -debug | 显示所有请求和响应 | nuclei -u http://example.com -debug | | -dreq, -debug-req | 显示所有请求 | nuclei -u http://example.com -dreq | | -dresp, -debug-resp | 显示所有响应 | nuclei -u http://example.com -dresp | | -p, -proxy string[] | 使用http/socks5代理(逗号分隔,文件) | nuclei -u http://example.com -p http://proxy1.example.com:8080,socks5://proxy2.example.com:1080 | | -pi, -proxy-internal | 代理所有请求 | nuclei -u http://example.com -pi | | -ldf, -list-dsl-function | 列出所有支持的DSL函数签名 | nuclei -ldf | | -tlog, -trace-log string | 写入跟踪日志到文件 | nuclei -u http://example.com -tlog trace.log | | -elog, -error-log string | 写入错误日志到文件 | nuclei -u http://example.com -elog error.log | | -version | 显示版本信息 | nuclei -version | | -hm, -hang-monitor | 启用对nuclei挂起协程的监控 | nuclei -u http://example.com -hm | | -v, -verbose | 显示详细信息 | nuclei -u http://example.com -v | | -profile-mem string | 将Nuclei的内存转储成文件 | nuclei -u http://example.com -profile-mem mem-profile.out | | -vv | 显示额外的详细信息 | nuclei -u http://example.com -vv | | -svd, -show-var-dump | 显示用于调试的变量输出 | nuclei -u http://example.com -svd | | -ep, -enable-pprof | 启用pprof调试服务器 | nuclei -u http://example.com -ep | | -tv, -templates-version | 显示已安装的模板版本 | nuclei -tv | | -hc, -health-check | 运行诊断检查 | nuclei -u http://example.com -debug -tlog trace.log -hm | ## 升级 | 选项 | 释义 | 示例 | | --- | --- | --- | | -up, -update | 更新Nuclei到最新版本 | nuclei -up | | -ut, -update-templates | 更新Nuclei模板到最新版 | nuclei -ut | | -ud, -update-template-dir string | 指定模板目录 | nuclei -ut -ud /path/to/custom/templates | | -duc, -disable-update-check | 禁用nuclei程序与模板更新 | nuclei -duc | ## 统计 | 选项 | 释义 | 示例 | | --- | --- | --- | | -stats | 显示正在扫描的统计信息 | nuclei -u http://example.com -stats | | -sj, -stats-json | 将统计信息以JSONL格式输出到文件 | nuclei -u http://example.com -sj stats.jsonl | | -si, -stats-inerval int | 显示统计信息更新的间隔秒数(默认:5) |nuclei -u http://example.com -stats -si 10 | | -mp, -metrics-port int | 更改metrics服务的端口(默认:9092) | nuclei -u http://example.com -mp 9093| 综合示例 假设你想在扫描过程中显示统计信息,将统计信息以 JSONL 格式输出到文件,并将统计信息的更新间隔设置为 10 秒,同时更改 metrics 服务的端口为 9093,运行命令: `nuclei -u http://example.com -stats -sj stats.jsonl -si 10 -mp 9093` ## 云服务 | 选项 | 释义 | 示例 | | --- | --- | --- | | -auth | 配置projectdiscovery云服务(pdcp)API密钥 | nuclei -auth your_pdcp_api_key | | -cup, -cloud-upload | 将扫描结果上传到pdcp仪表板 | nuclei -u http://example.com -cup | | -sid, -scan-id string | 将扫描结果上传到指定的扫描ID | nuclei -u http://example.com -cup -sid scan12345 | 综合示例 假设你想将扫描结果上传到 pdcp 仪表板,并指定扫描ID为 scan12345,同时配置你的 pdcp API 密钥,运行命令: `nuclei -auth your_pdcp_api_key -u http://example.com -cup -sid scan12345` # 编写yml文件 把POC发给AI,可以直接生成yaml https://cloud.projectdiscovery.io/templates nuclei 模板通常包含以下几个部分: - id:模板的唯一标识符。 - info:包含模板的基本信息,如名称、作者、版本等。 - author:模板作者。 - severity:漏洞的严重性等级。 - tags:用于分类的标签。 - requests:定义了如何与目标进行交互的请求部分。 - method:HTTP 方法,如 GET 或 POST。 - path:请求的路径。 - headers:请求头。 - body:请求体。 - payloads:用于定义可能的输入值。 - response:定义了如何分析响应以确定是否发现漏洞。 - status:期望的 HTTP 状态码。 - headers:期望的响应头。 - body:期望的响应体内容。 # yaml示例文件 ## 命令执行漏洞模板 ``` # 任务信息 info: name: Command Injection Vulnerability Scan author: your_name severity: critical description: The scan checks for command injection vulnerabilities by sending specially crafted payloads. # HTTP 请求 http: # GET 请求 - method: GET path: - "{{BaseURL}}cmd=whoami" matchers: - type: regex part: body regex: - "root|administrator|www-data" # POST 请求 - method: POST path: - "{{BaseURL}}execute" body: "cmd=cat /etc/passwd" matchers: - type: regex part: body regex: - "rootx00" # RAW 请求 (可选) - raw: - "GET {{BaseURL}}cmd={{rand_base64}} HTTP/1.1\r\nHost: {{Hostname}}\r\n\r\n" matchers: - type: dsl dsl: - "contains(tolower(body), 'rootx00')" ``` ## SQL注入漏洞模板 ``` id: sql-delay-injection-scan info: name: SQL Delay Injection Detection author: your_name severity: critical description: This template detects SQL delay injection vulnerabilities by measuring the response time of crafted payloads. http: - method: GET path: - "{{BaseURL}}/index.php?id=1" # Example path, adjust according to the application's parameter headers: User-Agent: "Mozilla/5.0 (Windows NT 10.0; Win64; x64) AppleWebKit/537.36 (KHTML, like Gecko) Chrome/58.0.3029.110 Safari/537.3" payloads: delay: - "1'" - "' AND (SELECT FROM (SELECT(SLEEP(5)))a) AND '1'='1" attack: clusterbomb # This will send all payloads for each path matchers: - type: dsl dsl: - "duration >= 5000" # The response time should be greater than or equal to 5000ms (5 seconds) to indicate a potential delay extractors: - type: regex part: body regex: - "SQL syntax.*SQL injection" # Extracts error messages that may indicate SQL injection ``` ## 任意文件读取漏洞模板 ``` id: arbitrary-file-read-scan info: name: "Arbitrary File Read Detection" author: "your_name" severity: "high" description: "The template checks for arbitrary file read vulnerabilities by attempting to access sensitive files." http: - method: GET path: - "{{BaseURL}}/pathtosensitivefiles/file=etcpasswd" - "{{BaseURL}}/download/path=.../etc/shadow" - "{{BaseURL}}/viewfile/filename=.../var/www/html/config.php" matchers: - type: regex part: body regex: - "root:x:.*" # Typical line in /etc/passwd - "shadow:" # Typical line in /etc/shadow - "DB_PASSWORD=" # Example of a configuration file containing a password - type: status status: - 200 extractors: - type: regex part: body name: sensitive_files regex: - "(\/etc\/passwd|\/etc\/shadow|\/var\/www\/html\/config\.php)" # Adjust the regex to match the files you are looking for response: - status: 403 # Forbidden status code, indicating the file is protected but accessible headers: - "Content-Type: text/plain" # Example of a header that might be returned for a protected file - status: 404 # Not Found status code, indicating the file does not exist or is not accessible ``` ## XSS漏洞模板 ``` id: reflected-xss-scan info: name: "Reflected XSS Vulnerability Detection" author: "your_name" severity: "medium" description: "This template detects reflected XSS vulnerabilities by sending payloads to the target URL and checking for the presence of the payload in the response." http: - method: GET path: - "{{BaseURL}}/search?q={{randstr}}" - "{{BaseURL}}/param={{randstr}}" payloads: - payload: "{{randstr}}" - payload: "%3Cscript%3Ealert%28%27xss%27%29%3B%3C%2Fscript%3E" # Encoded script: alert('xss');</script> attack_chain: # This will send the payloads after the randstr matchers: - type: word part: body words: - "scriptalert('xss');script" # Look for the exact payload in the response - "{{randstr}}" # Look for the random string in the response - type: status status: - 200 extractors: - type: regex part: body regex: - "[^<]script[^>].*alert.*([^<]script)" # Regex to capture scripts with alert - "(i)(href|src)=(data:jscript|vbscript|livescript|mhtml|javascript|about:mocha|frameset|xml|xslt|x-xrds|beap|#)" # Regex to capture potential XSS vectors ``` ## 反序列化漏洞模板 ``` id: snakeyaml-deserialization-scan info: name: "SnakeYAML Deserialization Vulnerability Detection" author: "your_name" severity: "high" description: "Checks if the application is vulnerable to SnakeYAML deserialization attacks by sending serialized Java objects." http: - method: POST path: - "{{BaseURL}}/apideserialize" # 假设的反序列化处理接口 headers: Content-Type: "application/x-java-serialized-object" body: | ACED00057372002D6F626A6563742E7365727665726C65735F7365727665726C6966652E5472696F6E67496E766F6B65... matchers: - type: word part: body words: - "java.lang.ClassCastException" - "java.io.InvalidClassException" condition: or - type: status status: - 500 ``` ## 弱口令漏洞模板 ``` id: weak-password-detection info: name: "Weak Password Detection" author: "your_name" severity: "info" description: "Attempts to detect weak passwords for basic auth, form logins, or specific APIs by sending common credentials." http: - method: POST path: - "{{BaseURL}}/login" body: | username={{username}}&password={{password}} headers: Content-Type: "application/x-www-form-urlencoded" # 定义 payload 提供用户名和密码组合 payloads: - username: "admin" - password: "123456" # 可以根据需要添加更多常见弱密码 # 使用 attack clusterbomb 模式发送所有用户名和密码的组合 attack: clusterbomb matchers: - type: dsl dsl: - "status_code==200 && contains(tolower(body), 'login successful')" # 假设登录成功会返回 200 状态码和包含 'login successful' 文本 - "cookiecontains(auth_token)" # 假设登录成功会设置一个 auth_token 的 cookie ``` ## 文件上传漏洞模板 ``` id: arbitrary-file-upload-scan info: name: "Arbitrary File Upload Vulnerability Detection" author: "your_name" severity: "high" description: "The template checks for arbitrary file upload vulnerabilities by attempting to upload files with known vulnerable extensions." http: - method: POST path: - "{{BaseURL}}/upload" # 假设的上传接口路径 headers: Content-Type: "multipart/form-data; boundary=----WebKitFormBoundaryX" # 构造一个带有文件上传的请求体 body: | ------WebKitFormBoundaryX Content-Disposition: form-data; name="uploadfile"; filename="{{randstr}}.php" Content-Type: "application/x-php" php echo 'File uploaded successfully'; ------WebKitFormBoundaryX-- matchers: - type: word part: body words: - "File uploaded successfully" # 假设上传成功会返回特定的成功消息 - type: status status: - 200 ```
无涯
2025年5月27日 17:07
转发文档
收藏文档
上一篇
下一篇
手机扫码
复制链接
手机扫一扫转发分享
复制链接
如果文档没有解决你的问题,建议把预期结果、命令、错误信息、截图等等发给**AI工具**提问,描述越详细越容易解决
Markdown文件
分享
链接
类型
密码
更新密码